Flink学习笔记:窗口

在前文中,我们已经了解了 Flink 时间和 Watermark 两个概念,今天就来聊一下 Flink 实时数据处理的另一个核心概念:窗口。

所谓窗口,可以理解为是对数据流中的一段数据进行处理的方法。那我们为什么需要窗口呢?在生产环境中,数据流中的数据往往是源源不断的,如果我们想要获取一段时间内数据的一些统计指标(最大值/最小值/平均值),这时就需要利用窗口来将数据收集起来,然后再进行计算。

如果按照处理的数据流的类型来划分,Flink 中的窗口可以分为 Keyed Window 和 Non-Keyed Window,其中 Keyed Window 是用来处理按照 key 分片之后的数据流,也就是需要先调用 keyBy 方法,再调用 window 方法。而 Non-Keyed Window 处理的则是未按照 key 分片的数据流,在使用的时候直接调用 windowAll 方法。

在官方文档中,列举了两种窗口的使用方法。

Keyed Window

1
2
3
4
5
6
7
8
9
stream
.keyBy(...) <- 仅 keyed 窗口需要
.window(...) <- 必填项:"assigner"
[.trigger(...)] <- 可选项:"trigger" (省略则使用默认 trigger)
[.evictor(...)] <- 可选项:"evictor" (省略则不使用 evictor)
[.allowedLateness(...)] <- 可选项:"lateness" (省略则为 0)
[.sideOutputLateData(...)] <- 可选项:"output tag" (省略则不对迟到数据使用 side output)
.reduce/aggregate/apply() <- 必填项:"function"
[.getSideOutput(...)] <- 可选项:"output tag"

Non-Keyed Window

1
2
3
4
5
6
7
8
stream
.windowAll(...) <- 必填项:"assigner"
[.trigger(...)] <- 可选项:"trigger" (else default trigger)
[.evictor(...)] <- 可选项:"evictor" (else no evictor)
[.allowedLateness(...)] <- 可选项:"lateness" (else zero)
[.sideOutputLateData(...)] <- 可选项:"output tag" (else no side output for late data)
.reduce/aggregate/apply() <- 必填项:"function"
[.getSideOutput(...)] <- 可选项:"output tag"

窗口分类

在上面的示例中,调用 window 和 windowAll 方法时,需要传入 assigner 参数,Window Assigner 是用来定义如何将数据流中的元素划分到各个窗口中。

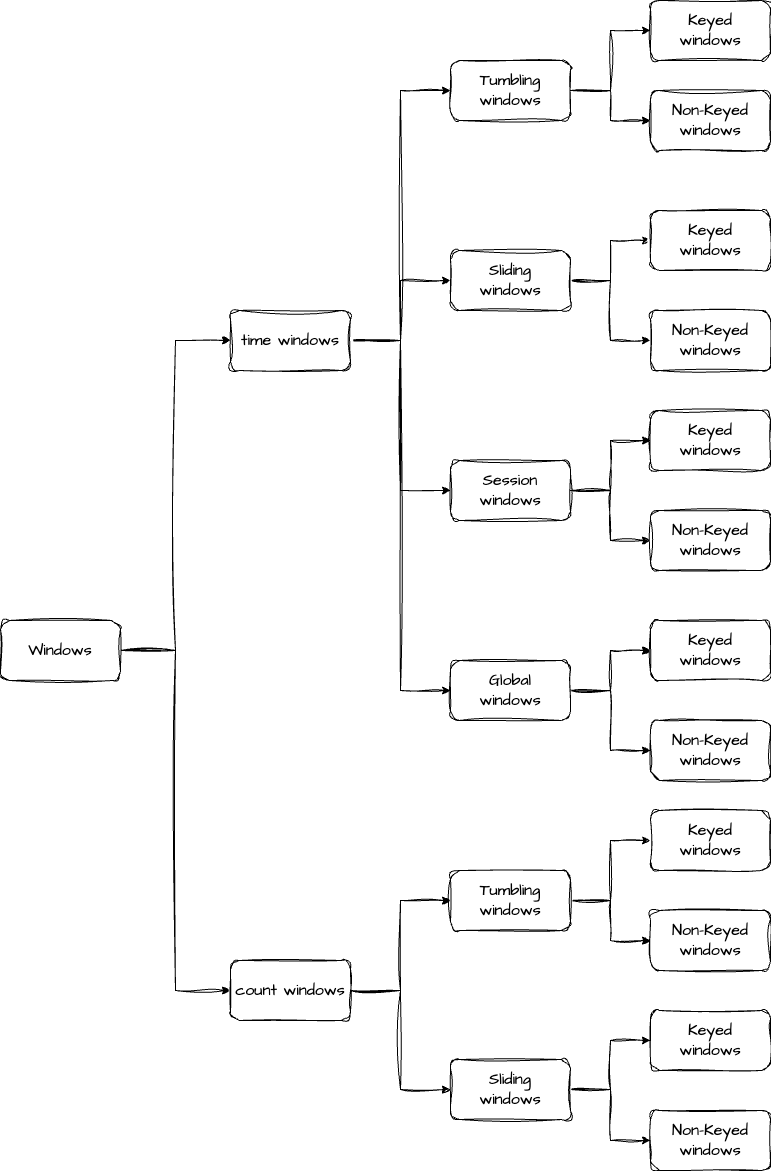
下面我们再对窗口进行一次分类,首先是根据划分依据,可以分为 time window 和 count window,time window 是根据处理数据的时间来划分,count window 则是根据处理数据的数量来划分。接着,我们再根据划分规则来分类,这里又可以将窗口分为滚动窗口(Tumbling Windows)、滑动窗口(Sliding Windows)、会话窗口(Session Windows)和全局窗口(Global Windows),需要注意的是,后面两种窗口不支持 count window。我们用一张图来表示窗口的分类会更加清晰。

窗口分类

我们在日常数据处理中,最常用的就是时间窗口,接下来就来详细了解下时间窗口的四种类型。
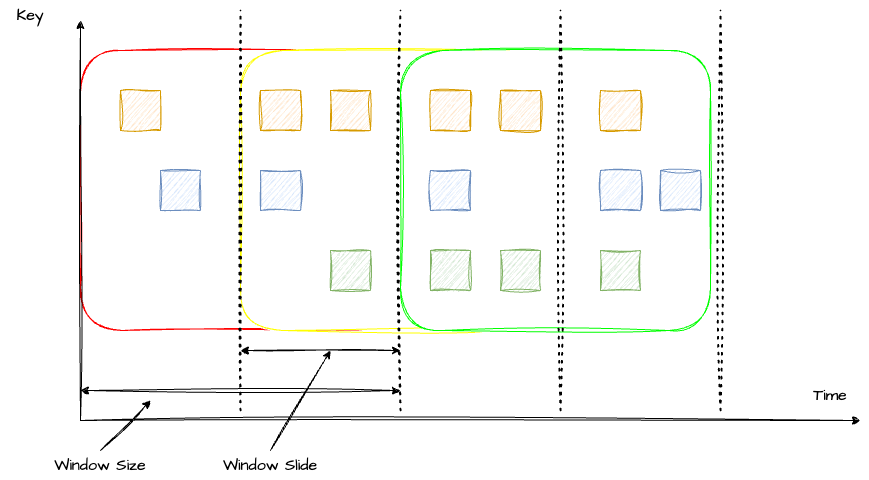
Sliding Windows

滑动窗口是以一个固定的步长不断向前滑动的窗口,滑动过程中,窗口的大小是保持不变的。在滑动窗口中,一个元素是可以被多个窗口计算的。

sliding_window

在代码中,可以通过 SlidingEventTimeWindows 类来定义滑动窗口,具体使用方法可以参考下面这个简单的 demo(这里多说一句,旧版本 Flink 传的是参数是 Time,新版本传的是 Duration):

1
2
3
4
5
6
7
8
9
10
11
12
13
14
15
16
17
18
19
DataStream<T> input = ...;

// 滑动 event-time 窗口
input
.keyBy(<key selector>)
.window(SlidingEventTimeWindows.of(Duration.ofSeconds(10), Duration.ofSeconds(5)))
.<windowed transformation>(<window function>);

// 滑动 processing-time 窗口
input
.keyBy(<key selector>)
.window(SlidingProcessingTimeWindows.of(Duration.ofSeconds(10), Duration.ofSeconds(5)))
.<windowed transformation>(<window function>);

// 滑动 processing-time 窗口,偏移量为 -8 小时
input
.keyBy(<key selector>)
.window(SlidingProcessingTimeWindows.of(Duration.ofHours(12), Duration.ofHours(1), Duration.ofHours(-8)))
.<windowed transformation>(<window function>);

上面代码中,如果不传 offset 参数的话,窗口开始时间会和 Linux 的 epoch 对齐,如果想要一些偏移量的话,就可以通过 offset 参数来控制(第二种方法)。在 demo 中,偏移量设置为 -8 小时,也就是使用东 8 区时间。
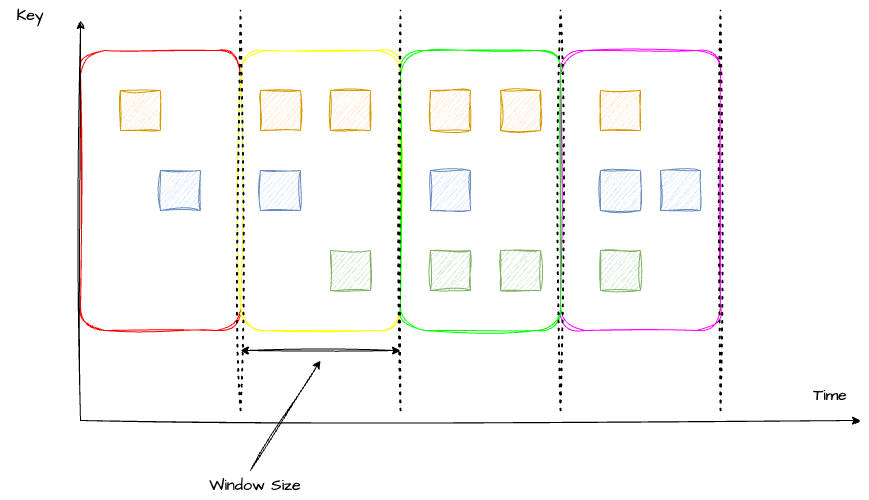
Tumbling Windows

了解了滑动窗口之后,我们再来看滚动窗口。滚动窗口可以认为是一种特殊的滑动窗口(Window Size = Window Slide)。滚动窗口之间是没有重叠的,也就是说,每个元素只能落到一个窗口中。

tumbling_window

在代码中通过使用 TumblingEventTimeWindows 来定义。

1
2
3
4
5
6
7
8
9
10
11
12
13
14
15
16
17
18
19
DataStream<T> input = ...;

// 滚动 event-time 窗口
input
.keyBy(<key selector>)
.window(TumblingEventTimeWindows.of(Duration.ofSeconds(5)))
.<windowed transformation>(<window function>);

// 滚动 processing-time 窗口
input
.keyBy(<key selector>)
.window(TumblingProcessingTimeWindows.of(Duration.ofSeconds(5)))
.<windowed transformation>(<window function>);

// 长度为一天的滚动 event-time 窗口, 偏移量为 -8 小时。
input
.keyBy(<key selector>)
.window(TumblingEventTimeWindows.of(Duration.ofDays(1), Duration.ofHours(-8)))
.<windowed transformation>(<window function>);

Session Windows

会话窗口和前两种不同,它的窗口大小是不固定的,也没有固定的开始和结束时间。当一个窗口超过 Seesion gap 没有收到数据之后,窗口就会关闭。Flink 也支持动态定义判断会话窗口不活跃的条件。

session_window

1
2
3
4
5
6
7
8
9
10
11
12
13
14
15
16
17
18
19
20
21
22
23
24
25
26
27
28
29
DataStream<T> input = ...;

// 设置了固定间隔的 event-time 会话窗口
input
.keyBy(<key selector>)
.window(EventTimeSessionWindows.withGap(Duration.ofMinutes(10)))
.<windowed transformation>(<window function>);

// 设置了动态间隔的 event-time 会话窗口
input
.keyBy(<key selector>)
.window(EventTimeSessionWindows.withDynamicGap((element) -> {
// 决定并返回会话间隔
}))
.<windowed transformation>(<window function>);

// 设置了固定间隔的 processing-time session 窗口
input
.keyBy(<key selector>)
.window(ProcessingTimeSessionWindows.withGap(Duration.ofMinutes(10)))
.<windowed transformation>(<window function>);

// 设置了动态间隔的 processing-time 会话窗口
input
.keyBy(<key selector>)
.window(ProcessingTimeSessionWindows.withDynamicGap((element) -> {
// 决定并返回会话间隔
}))
.<windowed transformation>(<window function>);

Global Windows

最后是全局窗口,它将所有的key都写到一个窗口,并且必须要指定 trigger 才能触发窗口的计算。

窗口函数

现在我们已经知道如何划分窗口,或者说如何把指定元素放入对应的窗口中了。接下来的问题就是窗口中的数据要怎么处理。这就是窗口函数的职责了。Flink 支持三种窗口函数,分别是:ReduceFunction、AggregateFunction 和 ProcessWindowFunction。

ReduceFunction

ReduceFunction 定义了如何把两条数据合并为一条。例如最常见的对 key 进行求和。

1
2
3
4
5
6
7
8
9
10
DataStream<Tuple2<String, Long>> input = ...;

input
.keyBy(<key selector>)
.window(<window assigner>)
.reduce(new ReduceFunction<Tuple2<String, Long>>() {
public Tuple2<String, Long> reduce(Tuple2<String, Long> v1, Tuple2<String, Long> v2) {
return new Tuple2<>(v1.f0, v1.f1 + v2.f1);
}
});

窗口输出的数据就是将多条相同 key 的数据求和后的数据。

AggregateFunction

ReduceFunction 其实是一种特殊的 AggregateFunction,AggregateFunction 的定义更加宽泛。它接收三个类型:IN(输入数据的类型)、ACC(累加器的类型)、OUT(输出数据的类型)。同时定义了四个方法:createAccumulator(创建一个累加器)、add(将一条数据加进累加器)、getResult(获取累加器结果)、merge(将两个累加器合并)

下面这个例子展示了如何对输入数据进行求平均值。

1
2
3
4
5
6
7
8
9
10
11
12
13
14
15
16
17
18
19
20
21
22
23
24
25
26
27
28
29
private static class AverageAggregate
implements AggregateFunction<Tuple2<String, Long>, Tuple2<Long, Long>, Double> {
@Override
public Tuple2<Long, Long> createAccumulator() {
return new Tuple2<>(0L, 0L);
}

@Override
public Tuple2<Long, Long> add(Tuple2<String, Long> value, Tuple2<Long, Long> accumulator) {
return new Tuple2<>(accumulator.f0 + value.f1, accumulator.f1 + 1L);
}

@Override
public Double getResult(Tuple2<Long, Long> accumulator) {
return ((double) accumulator.f0) / accumulator.f1;
}

@Override
public Tuple2<Long, Long> merge(Tuple2<Long, Long> a, Tuple2<Long, Long> b) {
return new Tuple2<>(a.f0 + b.f0, a.f1 + b.f1);
}
}

DataStream<Tuple2<String, Long>> input = ...;

input
.keyBy(<key selector>)
.window(<window assigner>)
.aggregate(new AverageAggregate());

ProcessWindowFunction

ProcessWindowFunction 执行效率不如前两者,因为它要获取窗口内所有的数据进行计算。但它也有另外两个窗口没有的能力,那就是在 ProcessWindowFunction 中可以通过 Context 获取到时间和状态信息。这样的能力带来的代价是大量的资源消耗,因此,为了减少不必要的资源消耗,我们通常将 ProcessWindowFunction 与 ReduceFunction 或 AggregateFunction 配合使用。我们来看一个例子。

1
2
3
4
5
6
7
8
9
10
11
12
13
14
15
16
17
18
19
20
21
22
23
24
25
26
27
DataStream<SensorReading> input = ...;

input
.keyBy(<key selector>)
.window(<window assigner>)
.reduce(new MyReduceFunction(), new MyProcessWindowFunction());

// Function definitions

private static class MyReduceFunction implements ReduceFunction<SensorReading> {

public SensorReading reduce(SensorReading r1, SensorReading r2) {
return r1.value() > r2.value() ? r2 : r1;
}
}

private static class MyProcessWindowFunction
extends ProcessWindowFunction<SensorReading, Tuple2<Long, SensorReading>, String, TimeWindow> {

public void process(String key,
Context context,
Iterable<SensorReading> minReadings,
Collector<Tuple2<Long, SensorReading>> out) {
SensorReading min = minReadings.iterator().next();
out.collect(new Tuple2<Long, SensorReading>(context.window().getStart(), min));
}
}

在这个例子中,我们返回了窗口中最小的元素和窗口的开始时间。因为我们先做了聚合,所以在 ProcessFunction 中就不用把所有的数据都存储在 State 中,而是只存储聚合后的数据即可。

Triggers

Trigger 决定何时触发窗口计算,每个 Window Assigner 都有一个默认的 trigger。当然,Flink 也提供自定义 trigger,自定义 trigger 只需要实现 Trigger 接口,并且在 .trigger() 方法中调用即可(在文章开头的示例中提到过)。

Trigger 接口提供了 5 个方法,分别是:

  • onElement() 方法在接收到元素时调用

  • onProcessingTime() 方法是在一个基于 ProcessTime 的 timer 触发时调用

  • onEventTime() 方法是在一个基于 EventTime 的 timer 触发时调用

  • onMerge() 方法在多个窗口合并时调用

  • clear() 方法是在窗口被移除时调用

前三个方法都会返回一个 TriggerResult,而这个 TriggerResult 的值就决定了窗口是否触发。TriggerResult 的值有以下四种:

  • CONTINUE:什么也不做

  • FIRE_AND_PURGE:触发计算并清空窗口内的元素

  • FIRE:只触发计算,不清空窗口内元素

  • PURGE:清空窗口内元素

Flink 内置了多个 trigger,常见的有 EventTimeTrigger、ProcessingTimeTrigger、CountTrigger 和 PurgingTrigger。

Evictors

Evictor 可以用于在 trigger 触发后、调用窗口函数之前或之后删除窗口内的元素。Evictor 接口提供了两个方法:

  • evictBefore() 方法是在调用窗口函数之前调用

  • evictAfter() 方法是在调用窗口函数之后调用

Flink 内置了三种 Evictor:

  • CountEvictor:记录用户设置的最大元素数量,当窗口内元素数量大于最大元素数量时,删除开头的元素

  • DeltaEvictor:用户需要设置计算差值的方法,evictor 会计算最后一个元素与窗口内每个元素的差值差值,并将大于用户设置的 threshold 的元素删除

  • TimeEvictor:用户需要指定窗口大小 windowSize,evictor 会计算窗口内元素最大的时间戳 maxTimestamp,将时间戳小于等于 maxTimestamp - windowSize 的元素清除

关于 Trigger 和 Evictor,只看概念可能还比较迷惑。我们来看一个具体的例子:假设我们需要一个实时监控系统,当连续收到 5 个大于阈值的数据时,发送告警。最终窗口中只保留 10 条数据。

trigger 的实现应该是

1
2
3
4
5
6
7
8
9
10
11
12
13
14
15
16
public TriggerResult onElement(Tuple2<String, Double> item, long l, TimeWindow timeWindow, TriggerContext triggerContext) throws Exception {
ValueState<Integer> state = triggerContext.getPartitionedState(new ValueStateDescriptor<>(stateName, Integer.class, 0));

if (item.f1 > threshold) {
int count = state.value() + 1;
state.update(count);

if (count >= countThreshold) {
state.clear();
return TriggerResult.FIRE;
}
} else {
state.clear();
}
return TriggerResult.CONTINUE;
}

evictor 的实现为

1
2
3
4
5
6
7
8
9
10
11
12
13
14
15
16
17
18
19
20
21
22
23
24
25
26
public void evictAfter(Iterable<TimestampedValue<Tuple2<String, Double>>> elements, int size, TimeWindow timeWindow, EvictorContext evictorContext) {
if (size <= maxSize) {
return;
}

List<TimestampedValue<Tuple2<String, Double>>> elementList = new ArrayList<>();
elements.forEach(elementList::add);
int toEvict = size - maxSize;
List<TimestampedValue<Tuple2<String, Double>>> toRemove = elementList.subList(maxSize, size);

// 4. 通过迭代器删除需要移除的元素(关键:遍历原始迭代器,匹配并删除)
Iterator<TimestampedValue<Tuple2<String, Double>>> iterator = elements.iterator();
while (iterator.hasNext()) {
TimestampedValue<Tuple2<String, Double>> element = iterator.next();
if (toRemove.contains(element)) { // 匹配需要删除的元素
iterator.remove(); // 实际删除
toEvict--;
if (toEvict <= 0) {
break;
}
}
}

System.out.println("Evictor finished: 保留了 " + maxSize + " 个元素");

}

完整代码我放到 GitHub 了,感兴趣的可以看一下。

总结

最后总结一下,今天我们了解了 Flink 中窗口相关的概念,首先是窗口分类,然后是 Window Assginer(分别介绍了滑动窗口、滚动窗口、会话窗口和全局窗口)。接着又了解窗口处理函数,即怎么计算窗口中的数据。最后学习的 trigger 和 evictor 的作用和用法。

Jackey Wang wechat
欢迎关注我的公众号,一起讨论如何写bug
-------------本文结束感谢您的阅读-------------
原创不易,感谢支持