前面我们已经把Redis Lua相关的基础都介绍过了,如果你可以编写一些简单的Lua脚本,恭喜你已经可以从Lua中学毕业了。
在大学课程中,我们主要学习Lua脚本调试和Redis中Lua执行原理两部分内容两部分。
Lua脚本调试
Redis从3.2版本开始支持Lua脚本调试,调试器的名字叫做LDB。它有一些重要的特性:
- 它使用的是服务器-客户端模式,所以是远程调试。Redis服务器就是调试服务器,默认的客户端是redis-cli。也可以开发遵循服务器协议的其他客户端。
- 默认情况下,每个debugging session都是一个新的session。也就是说在调试的过程中,服务器不会被阻塞。仍然可以被其他客户端使用或开启新的session。同时也意味着在调试过程中所有的修改在结束时都会回滚。
- 如果需要,可以把debugging模式调成同步,这样就可以保留对数据集的更改。在这种模式下,调试时服务器会处于阻塞状态。
- 支持步进式执行
- 支持静态和动态断点
- 支持从脚本中向调试控制台打印调试日志
- 检查Lua变量
- 追踪Redis命令的执行
- 很好的支持打印Redis和Lua的值
- 无限循环和长执行检测,模拟断点
Lua脚本调试实战
在开始调试之前,首先编写一个简单的Lua脚本script.lua:
1 | local src = KEYS[1] |
这个脚本是把src中的元素依次插入到dst元素的头部。
有了这个脚本之后我们就可以开始调试工作了。
我们可以使用redis-cli —eval命令来运行这个脚本,而要调试的话,可以加上—ldb参数,因此我们先执行下面的命令:
1 | redis-cli --ldb --eval script.lua foo bar , 10 |
页面会出现一些帮助信息,并进入到调试模式
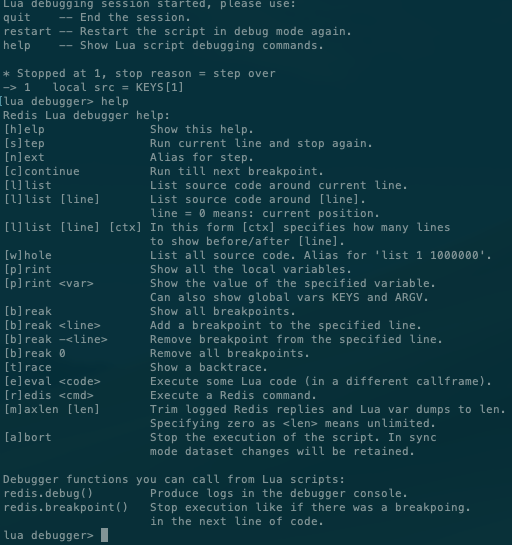
可以看到帮助页告诉我们
- 执行quit可以退出调试模式
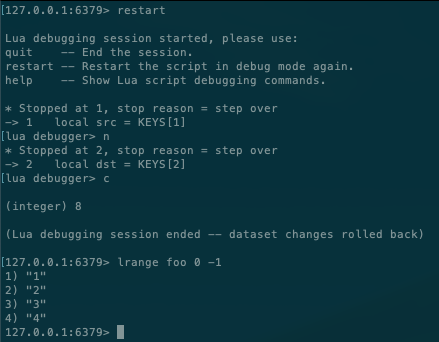
- 执行restart可以重新调试
- 执行help可以查看更多帮助信息
这里我们执行help命令,查看一下帮助信息,打印出很多可以在调试模式下执行的命令,中括号”[]”内到内容表示命令的简写。
其中常用的有:
- step/next:执行一行
- continue:执行到西一个断点
- list:展示源码
- print:打印一些值
- break:打断点
另外在脚本中还可以使用redis.breakpoint()添加动态断点。
下面来简单演示一下
现在我把代码中count = count - 1这一行删除,使程序死循环,再来调试一下

可以看到我们并没有打断点,但是程序仍然会停止,这是因为执行超时,调试器模拟了一个断点使程序停止。从源码中可以看出,这里的超时时间是5s。
1 | /* Check if a timeout occurred. */ |
由于Redis默认的debug模式是异步的,所以在调试结束后不会改变redis中的数据。
当然,你也可以选择以同步模式执行,只需要把执行命令中的—ldb参数改成–ldb-sync-mode就可以了。
解读EVAL命令
前文我们已经详细介绍过EVAL命令了,不了解的同学可以再回顾一下Redis Lua脚本中学教程(上))。今天我们结合源码继续探究EVAL命令。
在server.c文件中,我们知道了eval命令执行的是evalCommand函数。这个函数的实现在scripting.c文件中。
函数调用栈是
1 | evalCommand |
evalCommand函数很简单,只是简单的判断是否是调试模式,如果是调试模式,调用evalGenericCommandWithDebugging函数,如果不是,直接调用evalGenericCommand函数。
在evalGenericCommand函数中,先判断了key的数量是否正确
1 | /* Get the number of arguments that are keys */ |
接着查看脚本是否已经在缓存中,如果没有,计算脚本的SHA1校验和,如果已经存在,将SHA1校验和转换为小写
1 | /* We obtain the script SHA1, then check if this function is already |
这里funcname变量存储的是f_ +SHA1校验和,Redis会将脚本定义为一个Lua函数,funcname是函数名。函数体是脚本本身。
1 | sds luaCreateFunction(client *c, lua_State *lua, robj *body) { |
在执行脚本之前,还要保存传入的参数,选择正确的数据库。
1 | /* Populate the argv and keys table accordingly to the arguments that |
然后还需要设置钩子,我们之前提过的脚本执行超时自动打断点以及可以执行SCRPIT KILL命令停止脚本和通过SHUTDOWN命令停止服务器,都是通过钩子来实现的。
1 | /* Set a hook in order to be able to stop the script execution if it |
到这里已经万事俱备了,就可以直接调用lua_pcall函数来执行脚本了。执行完之后,还要删除钩子并把结果保存到缓冲中。
上面就是脚本执行的整个过程,这个过程之后,Redis还会处理一些脚本同步的问题。这个前文我们也介绍过了《Redis Lua脚本中学教程(上)》
总结
到这里,Redis Lua脚本系列就全部结束了。文章虽然结束了,但是学习还远远没有结束。大家有问题的话欢迎和我一起探讨。共同学习,共同进步~
对Lua感兴趣的同学可以读一下《Programming in Lua》,有条件的尽量支持正版,想先看看质量的可以在我公众号后台回复Lua获取电子书。